Sausage pizzas made from food storage.
Part of our food storage includes canning cheese and meat. Up until a few years ago we didn't have enough solar power here on our off-grid homestead to run a refrigerator, so things like cheese had to be canned so we could have them without making the long drive to town. I've already posted about our food storage cheeseburgers, but pizza is another one of our special foods from our storage.
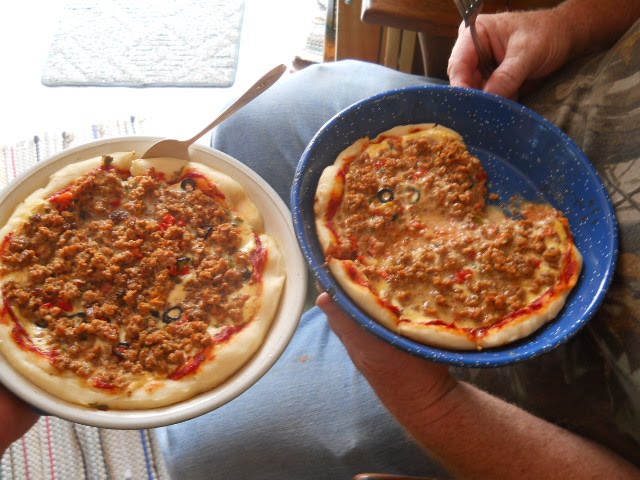
I start off by making the crust, which is very similar to making bread. I use one teaspoon of yeast rather than the 2 1/4 teaspoons that equal one packet of active dry yeast. I also add a teaspoon of baking soda, but other than that I use the same recipe I use for bread. In this picture I used pie pans because we were camping in our homemade camper-in-an-old-uhaul truck and I didn't have my pizza pan along. It worked good; my husband and I each got a 'pan pizza'.
For the sauce I open a can of tomato sauce or spaghetti sauce. If it's tomato sauce I add half a teaspoon each of oregano, basil, thyme, garlic powder, and fennel. I spread that on the crust.
Then I open a jar of mozzarella cheese.

I dip the jar in hot water to loosen the cheese from the sides of the jar, then using a knife I ease the cheese out of the jar. The cheese is the same consistency as fresh mozzarella cheese and it grates very nicely. In the picture at the top of this post I didn't have my cheese grater with me so I used my fingers and a paring knife to crumble the canned cheese into little pieces, and I spread those over the sauce on the crust. Now I keep a grater in the camper.
Next comes meat.

That particular pizza was made with our home-canned pizza sausage, which was made from a couple of hogs we raised and butchered in 2008. The picture (and pizza) is from summer 2010. I store home-canned meat in our dark, cool, hand-dug root cellar, which lengthens it's shelf life and we're not afraid to use meat a couple years old.

This food-storage pizza has ham and pineapple on it. I used canned ham chunks, the kind that come in little cans like tuna. It came from the Dollar Tree store. I have canned small jars of ham, too, using leftover ham from a holiday meal. The pineapple is canned pineapple tidbits from the store.

Other toppings I might put on the pizza are (clockwise, from bottom left) onions, peppers, mushrooms, olives, and in the center, tomoatoes. These are all home-dried, and the onions, peppers, and tomatoes were grown in our garden. The mushrooms and olives came from store-bought cans. When I open a can I rarely use the whole thing, so I spread the leftovers on drying racks and set them on special brackets we have above our woodstove. When they're dry, I add them to the jars.
When I first start a pizza I decide what is going to go on it. I put the dry vegetables in a bowl and add room-temperature water to them. If I do that before I start the crust, the vegetables are reconstituted and ready to use by the time I'm ready for them.
We don't use the whole can of pineapple, either, so next time I make a pizza I'm going to try dehydrating the rest of the can. My friend Dave, of Dave's Kitchen, says he does it with success. He has electricity, though, and uses an electric dehydrator. I'll have to make sure we have enough heat from the woodstove to dry the pineapple before it spoils or molds.
I'd like to try drying half of the can of ham, too, since we don't need the whole thing for a pizza. Both ham and crumbled sausage should dehydrate well, since they're both cooked meats. It would keep long enough to use it for another meal, without worrying about refrigeration.
One of the pizzas I plan to make from food storage soon will have canned chicken chunks and tomato, which is one of my favorite pizzas. I might even use some canned cream cheese and make it an alfredo pizza instead of using tomato sauce.
These are just suggestions for a special meal from food storage.
Please leave comments or suggestions below, or email them to povertyprepping@yahoo.com
Can you do a post on how you can the mozzarella cheese? I'd love to try some.
ReplyDeleteHere is a post I made a few months ago about canning butter and cheese. Scroll down below the part about canning butter to get to the cheese:
Deletehttp://www.povertyprepping.blogspot.com/2012/11/canning-butter-and-cheese.html
I've canned cheese both by pressure canning and water-bath canning, and I think the color and texture are a little better with water-bath canning. Be careful with cleanliness with water-bath canning, and start timing the processing time after the water is boiling good. I canned some mozzarella today, and I let it boil for 45 minutes. It came out beautiful.
Dried pineapple is like candy, especially if you sprinkle it with a bit of brown sugar and let it sit a day or two to soak up the sugar. It gets this chewy-but-tender texture to it that is really addicting!
ReplyDeleteSounds yummy! So...dumb question. Sprinkle it with brown sugar and let it sit before, or after, drying it?
DeleteThanks for sharing this with us!
Susan
I dry pinapple rings for camp and trail snacks. i do use the canned ones. I drain them and then dredge in sugar and run in my dehydrator. be warned that the sugar will turn into a syrup and drip at the begining of the process. The sugar is used as a preservative to prevent spoilage at the begining of the process. Pineapple will turn in a matter of hours if held at room temperature. the surar is used to begin the process and helps avoid spoilage untill drying really gets going. Thing a real sugar cured ham.
ReplyDeleteThat's interesting, and it sounds delicious. I'll have to give that a try. I didn't know pineapple would go bad so quickly while dehydrating it. Do you use a hotter temperature too, to speed up the drying process, at least at first? Or just dry them like any fruit?
DeleteSusan