Showing posts with label preparedness.. Show all posts

Sunday, January 19, 2014

Food Storage Tips - Guest Post


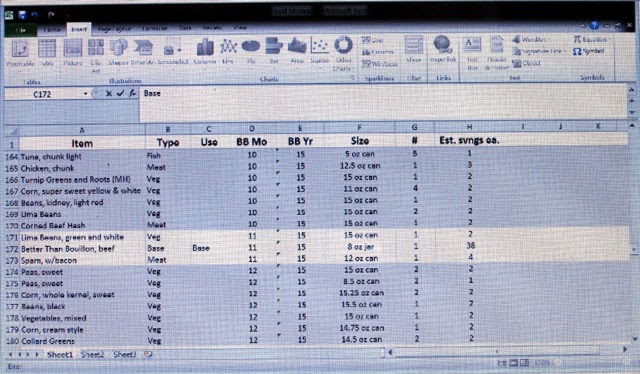
I love the emails I get from readers, and every now and then someone shares their story.  When I emailed this woman back and asked if I could use it for a blog post, she not only said 'yes', she emailed me a copy of her spreadsheet and a picture! 


"When I started prepping I had more extra money every month than I do now, but even then I had to be careful.  I made a rule: anything on my shopping list that I know I will need or want in hard times, I would buy at least one extra for storage.  I prefer fresh vegetables, so if I were buying fresh corn, then I also bought a can or two of corn, if it was on sale.  I increased my shopping budget for about 6 months, but I have a good pantry full of things I know I will enjoy in an emergency.
 
I needed storage space for food, so I went on a hard core cleanup, donating or throwing out things that were less important to me than food would be in an emergency.  That was tough at the beginning but is easy now.  I look at old games or books or clothes and throw enough away to make room for one meal, or a week’s worth of meals, or whatever.
 
Then, because I could not stand the idea of allowing any of this hard-won food go to waste, I organized my food by expiration dates.  So, everything that expires in Jan 2014 is together – milk powder, vegetables, meats, bouillon, etc., and then all the food for Feb 2014, and so forth.   Naturally, everything in storage has its expiration date written on the front with a Sharpie. 


Everything is in the pantry but on the first of each month, I bring next month’s food into my kitchen cabinet and look for recipes to use every scrap before it expires.  I’ve learned to make new dishes and can say proudly that nothing has been thrown out! 
 
Because I wanted easy access to food I might need, I also made a spread sheet of all my food on the computer and can search for “tomatoes” if I run short.  So, the next rule is: replace anything used from storage.  The system works well for me because I am forced to use food by expiration date rather than running the risk of missing the use of something located in a group of its kind.  The next 2 rules: remove any item from the spreadsheet that is removed from the pantry and add newly-bought items to the spreadsheet before putting into the pantry.


For “treats” I have collected a variety of local honeys, which I absolutely adore.  I have also bought large containers of raw honey for medicinal purposes in a time of great need.  Honey is yummy, has antibacterial properties, and can be stored easily forever.  The perfect food!
 
Oh, yes, and I used my tax refund for freeze-dried meats, vegetables, and fruits instead of the vacation or clothes-shopping I might have done otherwise.
 
I am almost 66, live alone (well, with 3 dogs and 2 cats) in the country, keep a pretty ordinary garden, and am more than a little worried about our future.  I’m not anyone’s psychic friend and have no idea how things will play out, but I do know that I am far less worried now that there are rows of food in my pantry.  Prepping has done me a lot of good already!
 
Thank you, Susan and Dave, for your helpful books (I also have “Life Without Refrigeration” and “Preserving Meat, Dairy, and Eggs”).  I try to save a little money each month for helpful books, too.
 
TuationNC
 
Thank you, TuationNC, for letting me share this with others.  I'd welcome more information like this, or stories of how you needed or used your preps/food storage in hard times, or anything else that could help or encourage our readers.
 
Please leave comments or questions below, or email them to: povertyprepping@yahoo.com

Tuesday, January 29, 2013

Dave's Kitchen - Canned Eggs

Here's some first-hand information from Dave.  Please make informed decisions about what you try at home, and follow safe food handling and processing practices.

 
Canned Eggs  - by Dave
 
Since people have been asking about
canning eggs, I thought I would write up a "How-To"
with pictures.

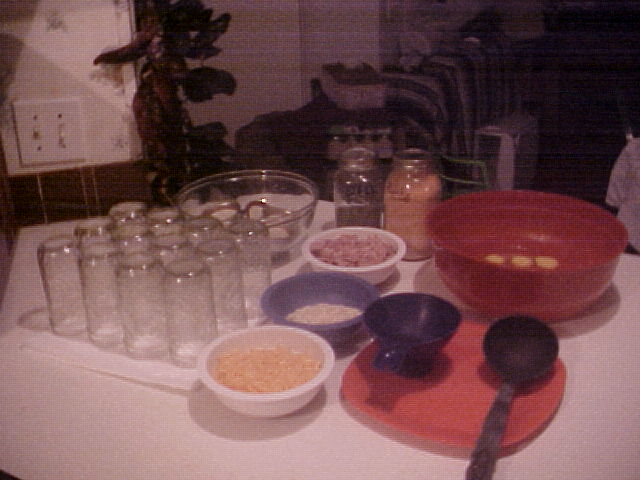
 My working area with items/ingredients needed.


I used 10 ounce jelly jars, I didn't have any wide-mouth
pints empty(what I usually use) and the grocery
store didn't have any either so I settled on the jelly
jars.

The ingredients I used are:
 
                                        1. Shaved Deli Ham(because it was very dry)
                                        2. Cheddar Cheese - Grated
                                        3. Dehydrated Onion
                                        4. Paprika - Homemade from dried sweet peppers
                                        5. Dill
 
 
The ingredients


First, I put the ingredients into the jars.  The amount
of ingredients will add to the fill level of the jar so
don't over do it.
 

I cracked 2 eggs per jar into a bowl and lightly whipped
them, whipping only until mixed. Lightly mixing adds less
air to the mixture and the "Omelet" will expand
less while cooking. The egg mixture will sometimes
double in volume during cooking and can spew the
contents out of the jar out into the pan, blow the lids
off or even break the jars.
 
The jars filled with egg and ingredients, ready
                                                               to go into the canners.
 
Quite a few people have questioned me about cooking time
and method, so on this batch of a dozen jars, I water-bathed 6 jars
for 1 hour, and pressure canned the other 6 jars at 5 psi for 45 minutes.
Both ways seem to have worked well.
 
The setup I use to keep the half full jars from
                                                   floating during the Water Bath.
 
 
The jars of eggs right out of the Water Bath.
                                                                       1 hour.
 
The jars of eggs right out of the Pressure Canner.
                                                            45 minutes at 5psi.
 
Notice that the eggs doubled in size during cooking.
This is the reason to only fill the jars half full.
After they cool down, the contents will shrink back down
to a degree, but not back down to the fill level.
 
 
Thank you, Dave.  Please leave comments
 and questions below, or email them to
Susan
 

Sunday, January 6, 2013

Food Storage Pizza

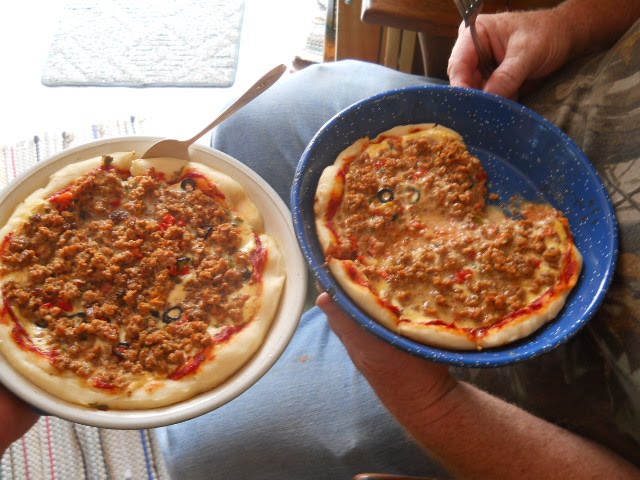
Sausage pizzas made from food storage.
 
Part of our food storage includes canning cheese and meat.  Up until a few years ago we didn't have enough solar power here on our off-grid homestead to run a refrigerator, so things like cheese had to be canned so we could have them without making the long drive to town.  I've already posted about our food storage cheeseburgers, but pizza is another one of our special foods from our storage.
 
I start off by making the crust, which is very similar to making bread.  I use one teaspoon of yeast rather than the 2 1/4 teaspoons that equal one packet of active dry yeast.  I also add a teaspoon of baking soda, but other than that I use the same recipe I use for bread.  In this picture I used pie pans because we were camping in our homemade camper-in-an-old-uhaul truck and I didn't have my pizza pan along.  It worked good; my husband and I each got a 'pan pizza'.
 
For the sauce I open a can of tomato sauce or spaghetti sauce.  If it's tomato sauce I add half a teaspoon each of oregano, basil, thyme, garlic powder, and fennel.  I spread that on the crust.
 
Then I open a jar of mozzarella cheese.
 
 
I dip the jar in hot water to loosen the cheese from the sides of the jar, then using a knife I ease the cheese out of the jar.  The cheese is the same consistency as fresh mozzarella cheese and it grates very nicely.  In the picture at the top of this post I didn't have my cheese grater with me so I used my fingers and a paring knife to crumble the canned cheese into little pieces, and I spread those over the sauce on the crust. Now I keep a grater in the camper.
 
Next comes meat.
 
 
That particular pizza was made with our home-canned pizza sausage, which was made from a couple of hogs we raised and butchered in 2008.  The picture (and pizza) is from summer 2010.  I store home-canned meat in our dark, cool, hand-dug root cellar, which lengthens it's shelf life and we're not afraid to use meat a couple years old.
 
 
This food-storage pizza has ham and pineapple on it.  I used canned ham chunks, the kind that come in little cans like tuna.  It came from the Dollar Tree store.  I have canned small jars of ham, too, using leftover ham from a holiday meal.  The pineapple is canned pineapple tidbits from the store.


Other toppings I might put on the pizza are (clockwise, from bottom left) onions, peppers, mushrooms, olives, and in the center, tomoatoes.  These are all home-dried, and the onions, peppers, and tomatoes were grown in our garden.  The mushrooms and olives came from store-bought cans.  When I open a can I rarely use the whole thing, so I spread the leftovers on drying racks and set them on special brackets we have above our woodstove.  When they're dry, I add them to the jars.
 
When I first start a pizza I decide what is going to go on it.  I put the dry vegetables in a bowl and add room-temperature water to them.  If I do that before I start the crust, the vegetables are reconstituted and ready to use by the time I'm ready for them.
 
We don't use the whole can of pineapple, either, so next time I make a pizza I'm going to try dehydrating the rest of the can.  My friend Dave, of Dave's Kitchen, says he does it with success.  He has electricity, though, and uses an electric dehydrator.  I'll have to make sure we have enough heat from the woodstove to dry the pineapple before it spoils or molds.
 
I'd like to try drying half of the can of ham, too, since we don't need the whole thing for a pizza.  Both ham and crumbled sausage should dehydrate well, since they're both cooked meats.  It would keep long enough to use it for another meal, without worrying about refrigeration. 
 
One of the pizzas I plan to make from food storage soon will have canned chicken chunks and tomato, which is one of my favorite pizzas.  I might even use some canned cream cheese and make it an alfredo pizza instead of using tomato sauce.
 
These are just suggestions for a special meal from food storage.
Please leave comments or suggestions below, or email them to povertyprepping@yahoo.com

Wednesday, December 12, 2012

Dave's Kitchen - Dried Cranberries

 
Dried Cranberries

To dehydrate cranberries they have to be cut or they will just cook and swell up before they dry. I had sliced each berry in half with a knife to fill the first 5 gallon bucket but I got smart and chopped them in a food processor for the second. The picture attached was with the berries ran through the food processor. It really sped up the process.
 
They can be used pretty much the same way as you would use fresh, just soak them in water first. To make cranberry sauce, just put them in a pot of boiling water with sugar and they will cook up great. They have a high pectin content and will form a thick sauce when they cool, just like a fruit jelly. They also make a good tea, just pour boiling water on some in a cup and let it sit for a while and drink hot or add ice and drink it cold - add some sugar if you like.
 
I add them to sweet potatoes when baking them with brown sugar(candied sweet potatoes), add them to the dish dry and they will soak up liquid as they cook. They also go good in pumpkin or sweet potato bread, add them dry and they cook up fine. If you add fresh berries to the batter they will be soft and mushy in the loaf but added dry they do well.
 
My daughter brought in 4 more bags of fresh cranberries yesterday that I haven't done anything with yet. I'm going to slice them and soak them in sugar before I dry them and see what they come out like. That may make a good snack item(if we're lucky), nothing like experimenting to learn something new, huh?

Sunday, November 25, 2012

Dave's Kitchen - Brined Green Beans

When bringing in produce from your garden, there are times when you have more than you can eat but not enough to warrant getting out the tools and utensils out to process it.

Produce can be stored in the fridge until you have enough but but things like Green Beans can spoil if kept more than a few days.

Green Beans can be "Brined" and kept that way for weeks without spoiling.  That can preserve them until enough are gathered to work with.
 

Brined Green Beans

To brine the beans, wash snap, string or cut them like you would
when preparing them to cook or can.

In a crock, cooking pot or other container, put a thin layer of green
beans in, then add a layer of salt and repeat until the container
is full or you run out of beans.  Top with an additional layer of
salt. Cover the container and set it aside.

Fairly quickly the beans will start to "cry" and after a day or
so the beans will be "swimming" in a brine formed by the salt and
liquid that was drawn out. They can be covered and stored this
way for weeks.  Just make sure the level of the liquid
stays above the green beans. If the brine level drops, just add
water.

More beans can be added and layered with salt as they come
in from the garden until the container is full.  Again, just make sure the
level of the liquid stays above the beans.

When you get ready to prepare them for preserving or eating, drain
the brine and soak them in fresh water for several hours or until the
salt leeches out, and process them like fresh beans. They can be
dehydrated, strung to air dry, or canned. Just process them
and treat them like fresh.

Keep in mind that if the beans are left in the brine for too long, they
may start to ferment and become "Pickles". Theres nothing wrong
with Pickled Green Beans but they will need to be treated like pickle
and processed accordingly.


 The freshly snapped green beans in a bin
layered in salt.


 The same bin after it has sat overnight, the salt has drawn
the juices out of the beans and formed the brine.


This is not an indefinite long term method of preserving and store
your green beans but is a good process to be familiar with.


I have a fresh email from Dave about the beans:

 
Just a note about the green beans...
We had our Thanksgiving meal and one thing on the menu was Green Beans so I made up a batch of the ones that have been in the brine for about 10 days now. They were every bit as good(and crisp) as if they had been prepared fresh. I soaked them in fresh water overnight then lightly boiled and drained the water again, they cooked up with just enough salt to season them to taste.
 
I am leaving the rest of the batch in the brine to see just how long they will last before they start to pickle.
 
Dave...
 
I hope he'll let us know about the green bean brine-to-pickles process!


Sunday, November 18, 2012

Soap Making

This post is a reader-contribution and has information for making soap.  I'm sure there are many of you who have made your own soap, and possibly do so regularly, but a lot of people never have, including myself.  It's on my list of things to learn and do!

Simple Lye Soap

Need

3 Pounds Lard
1 16 Ounce Container Lye
1 1 Quart Canning Jar
1 8 Quart Enameled or Stainless Steel Pan
1 Plastic or Stainless Steel Stirring Tool ( long handled)
2 9 x 13 Glass or Coated Baking Dishes
Cooking Thermometer.

Precautions

1. Lye is extremely corrosive, you may want to wear rubber gloves.
2. When Lye is mixed with water, it gets HOT. Possible as high as 160 - 180 degrees.

3. Vinegar applied to splashes of Lye on the skin can help nutralize it. Wash any lye
spills Immediately with lots of water then finish it with a wipe of vinegar.

Directions.

- Melt the 3 pounds of lard using a low heat in the enameled pan. Do not

let the lard start to smoke.  The lard doesn't need to be hotter than about 120 degrees.

- Pour the lye into the 1-quart canning jar, then add water to make a total volume of 1 quart.
Do not pour the lye into the water, it could boil, splash out of the jar or over run the jar and
spill. Using a canning jar will ensure that it will not break with the sudden temperature
change created by the lye.

- Let the lye solution cool to no more than 120 degrees.

- Make sure the lard is about 120 degrees.

- Pour the lye solution into the pan with the lard and start stirring. the mixture.

- Continue to stir the mixture until it starts to "Trace".

Tracing is when the (at this point Soap) starts to show a lighter color in the ripples when
stirred. The soap will gradually start to thicken and if you dont see a trace but do notice
that the ripples from stirring start to remain above the rest of the soap for a short while,
that will be sufficient. The soap will usually have to drop below around 90 degrees(but not
always) before it trace. If you pour he soap
too soon, it may "sweat", while it is setting.
The sweat is beads of lye forming on he surface, it doesn't mean the soap is bad but you
dont want it to contact skin or unenameled utinsils.

- When the trace is seen, pour the soap into the baking dishes and let it harden. Hardening
may take a day or more. When a trace is seen, you can add any fragrance or oils as desired.

- After the soap hardens enough to hold a cut without it filling back in after slicing, cut the
block into bar sized pieces and let it continue to harden(in the baking dish) until about
the consistancy of regular bar soap.

- Remove the bars from the baking dish, seperate them and put them in a safe place to
Cure(in the open air).

The curing process is the period of time that the chemical reaction uses to make the lard/lye
mixture into usable soap. A safe bet is about a month or longer. If you use the bars before it
is fully cured, the lye will burn your skin(sometimes severly).


- Once the soap has cured, it can be stored in a bin, box, jar or other suitable container.


After the soap has cured, it is very mild and safe to use for most cleaning jobs. Be advised
that the bars will not lather near as much as commercial soaps but will clean, IMO,
better than bought bars and it usually leaves less residue on your skin and in your hair.

A good habit to make is to immediately wash all utinsils used, with plenty of water and
vinegar solution to ensure that no lye is left to cause problems. Some people dedicate
specific utinsils and pans for the sole use in soap making.

Different people have procedures for making lye soap that may differ from this method. It
doesn't mean that either is right or wrong. The imporant thing is that the result is usable
soap.
 

I have a few questions myself after reading this, so I'll be emailing the contributor to ask about them.  I was confused about the jar.  The directions say to put the lard in the jar and add water to make a quart.  Then it says that when the lye has cooled to around 120 degrees, add it to the lard in the pan.  But it said that using a canning jar made it so the jar wouldn't break with the sudden temperature change of adding the lye.  But I thought we were combining them in the pan?  And if we've filled the jar with lard and water to make a quart, we wouldn't have room to add the lye mixture to the  jar. 

I'm running on extreme sleep deprivation so it's probably me and not the directions that are confused!  My daughter's car broke down 40 miles from home in the middle of the night last night, so I've pretty much been up since yesterday morning.  I'll clarify these directions and update it later.

I have a couple things of my own to add.  My other daughter has made soap, but it was while she was living some distance away.  She had a hard time finding lye and finally got some at Ace hardware.

Several years ago we had a neighbor who made his own lye.  He took an old washtub and made a small hole in the middle of the bottom.  He filled the washtub with ashes from his woodstove and poured water over them.  The water seeped through the ashes and out the hole, into a bucket under the washtub.  That water was lye. 

He only burned oak and hickory in his woodstove, which are hardwoods.  I don't know if the ashes from pine woods or other wood would also produce lye.  I'll see if I can find that out too.  Here in our part of the country we only have pine and fir trees.

I would love to hear from other soap-makers.  Anything you want to add would be nice.  Email it to me at povertyprepping@yahoo.com, or leave a comment here on the blog.

Thanks!
Susan

From the mailbox, November 19, 2012:

"Hi -

I came across your blog today. Nice job!

You posed a question about what kind of wood ash to use when making lye
for soap - it generally needs to be hardwood. I tried using pine once
outdoors and the results were not good- usable in a pinch but it never
firmed properly. It was usable in making biofuel but was not as
efficient as using hardwood ash.

I also wanted to send you this link which you might find interesting:

http://journeytoforever.org/biodiesel_ashlye.html

Thanks again for the great blog and I'm looking forward to reading your
book
--
SEJackson"


Thanks for your email, and for answering my question about making lye.  The link you included is very helpful on the subject too. 

Susan