Showing posts with label prepping blogs. Show all posts

Wednesday, October 29, 2014

Canning pies

 
 I've been canning cobbler for a while, and we've been enjoying eating it, but this week I got the idea to try canning pie.  I still had a few bags of apples from this fall's harvest that I hadn't gotten canned yet, so I decided to experiment with some of them.

First I peeled and cut up the apples and mixed them with sugar, cinnamon, and flour.  I used about a cup of sugar, a Tablespoon of cinnamon, and half a cup of flour, and stirred that together first, then stirred it into the apple pieces.

I mixed up pie crust.  I used 4 cups of flour, a scant teaspoon of salt, and a teaspoon of sugar, which I stirred together.  Then I put in about half a cup of coconut oil (which is solid like shortening at our room temperature.  You can use shortening or lard if you'd rather) and a quarter cup of butter (you can use margarine, or just use shortening for this too).  I have a pastry blender but I never use it.  I just grabbed a sturdy table fork out of the drawer and mashed the coconut oil and butter into the flour until it was all even.  I had to turn the bowl a few times and stir some of the flour to the center so I could get it mashed in with the oil. 

When it was all evenly crumbled into the flour I poured in one cup of milk and 1/4 cup water.  I stirred it until it was mostly a blob of dough.  Then I used my hands to work the rest of the flour into it, packing it like a snowball instead of kneading it, though I did have to squeeze and work the dough ball some to get it all smooth and even.  They say if you knead or work pie crust dough too much you'll have hard crusts.  I wasn't sure it mattered in canning, but I tried to do it like I would for a regular baked-in-the-oven pie.

Now for the fun part.  I used wide-mouth pints because they have nice straight sides and I figured I could just run a knife around between the jar and the crust, and slide the pie right out.  I measured the diameter and circumference of the jar.  3 1/2" by 8".  I rolled out some of the crust and used a measuring tape and a stick to cut the dough to the that size.  I flattened a disk of dough and put it in the bottom of the jar.  Then I laid the crust in the jar, rolled around against the sides.  It immediately buckled and I had to use my fingers to mash it back against the sides.  I quickly spooned in some of the apple filling, packing it just a bit to work the apple pieces down in against each other, without packing it too tight.

I decided the heck with rolling it out.  I just took pieces of dough and flattened it some in my hands, then pressed it against the jar sides, working up from the bottom.  I mashed the pieces together to make a solid crust all the way around the jar, then put the apple filling in it.  Then I made another disk to put across the tops.

 
I didn't think to get a picture with the filling in the jars, and no 'top disk' of crust on them.  The three jars to the left are filled and have the crust on top.  The one on the right has the crust mashed against the sides, and I'm about to spoon the apples into it.
 
 
When I had all the jars filled I put a dab of butter on the top crust.  You can see that in the center of each jar.  I was already wiping rims and putting the lids on when I thought to take a picture.  The lids are in the pan to the right.  They had been simmering on the stove to soften the seals while I filled the jars.  Next they went into the pressure canner.
 
 
Apples by themselves can be canned in a water-bath canner, but I wasn't sure about a flour-based product like pie crust.  So I went ahead and used my pressure canner.  I canned them for 15 minutes (once the weight started jiggling) at 10 lbs. pressure.  We are at 3,500' of elevation, so I always can at higher pressure than people who live at low elevations.  If you're under 1,000' of elevation you could can this at 5 lbs. pressure.


These are the finished pies.  There were seven but we ate one and we gave a jar to our daughter and grandkids.  I didn't take this picture until this morning.  These definitely need to be labeled because I can see myself pulling one off the shelf and thinking "What in the world is THIS?"


Like I said, we ate one.  It had cooled a bit but was still warm.  I slid the knife around between glass and crust and confidently tipped it over the plate on the right.  The filling plopped out onto the plate.  I had to nudge the crust, then it fell out on top of the filling.  Oh well, I shrugged.  I divided part of the crust and part of the filling onto each plate.  My husband made hot cocoa and we sat down to enjoy an evening snack.
 
 
The filling was a tad sweeter than necessary, and since it was still warm, it was a bit syrupy.  It had soaked into the crust somewhat, but the crust wasn't really soggy.  It was like all of the crust was "the bottom crust", and not like the flaky top crust would be.  It was delicious.
 
Next time I try this I'm going to drain the apples better.  As I peel and cut them I drop the pieces into a big bowl of water with a crushed vitamin C tablet in the water to keep the apples from turning brown.  I'm also going to add a bit more flour for thickener. 
 
I also think if the pies were completely cooled they would thicken more.  Then I could dip the jar in hot water to help loosen the crust from the jar, since I can't get a knife under the bottom 'disk' of crust.  I'd still run a knife around the side to make sure it was loosened.  I had imagined a cylinder of pie sliding out onto the plate, which I could then slice. 
 
We're not very picky around our house.  Most of our family and friends have thought this would be cool.  Some have turned their noses up and thought I should just can the apples and make the pies 'fresh' as we want them.  But I think this is great because if we've worked hard all day and I'm tired, I have instant pie ready to serve.  If we go to town (60 miles to town) I can take our own healthy food to eat and bring along a pie.  They would be great for camping, or on long trips.
 
Some people freeze extra pies, but right now we don't have a freezer.  If you've read my other posts you know that our refrigerator died a few weeks ago.  We were using a small 'college' freezer after that, but now it's cold enough outside that we've unplugged it for the winter, as we do every year.  We have solar electric power and the days are too short and cloudy in the winter for running a refrigerator, and nature provides refrigeration for about 6 months up here. 
 
I have frozen pies in the past and I think that my canned pies are pretty similar to what you get when you thaw a cooked-then-frozen pie.  My mom would make up pies and freeze them without baking them, and the crust and filling were always kind of watery when she'd thaw and cook them.  I'm sure other people have had more success with that, because I see frozen pies for sale at the grocery stores.


Please leave comments or questions below, or email them to:
 
(and be patient.  I get so many emails it takes a while to answer everyone,
especially this time of year.)
 
Thank you
 
Susan


Monday, October 20, 2014

Preserving Vegetables, Grains, and Beans

Dave and I have finished and published our third book together.  The first two are "Preserving Meat, Dairy, and Eggs", and "Preserving Fruits, Nuts, and Seeds".  It took months of research, experimenting, and writing, and dozens of emails flying back and forth between Montana and Texas, but it was a fun project. 


Here's the blurb for the book from the Amazon website:
 

"There are a lot of books about food preserving but what sets this book (and the first two of this series, “Preserving Meat, Dairy, and Eggs” and “Preserving Fruits, Nuts, and Seeds” is that each food and all of the methods for preserving that particular food are described in their own chapters.
In Part I of this book it begins with vegetables and works it's way through each vegetable in alphabetical order. Then on to Grains and then Beans (legumes). All methods of preserving that work well with each food are explained along with directions for the preparation and processing of that food. There is also information about what doesn't work and why.
In Part II it explains the preservation methods and how to do them, and what you'll need for: Canning, Dehydrating, Freezing, Salting, Brining, Sugaring, Smoking, Pickling, and Fermenting, as well as some not-as-often heard-of methods: Ash, Oil, and Honey for food preservation.
Everything is something that the authors have personally done or tried, or in a few cases, spoke to someone who had. Both authors have been preserving food for about half a century, first as kids helping their parents, and then as adults (and parents) preserving food for their families. 
The authors live on opposite ends of the country (North and South) and bring some of their own regional flavor to the book, making it interesting as well as informative."
 
 
If you already own the first two this will round out your collection.  We hope it's a useful and helpful book.
 
Please leave comments or questions below, or email them to:
 
 
Thanks!
Susan (and Dave) 


Sunday, September 21, 2014

Canning Soups and Stews


A lot of people make soup and stew and can it, but I've had a few people lately ask me how to do it without turning some of the softer ingredients to mush.  Well, some things will turn to mush anyway, but there are alternatives you can use that will make that less likely.  For instance, chicken noodle soup.  If you use egg noodles they will probably turn into clumpy blobs of 'pudding' while in the pressure canner. 
 
Some people don't mind that.  It's sort of like chicken and dumpling soup then.  But if you don't like 'pasta pudding', here's some other ideas.  First of all, you can use a harder type of pasta.  The most common is fettucine.  It's long and thin like spaghetti noodles but it's flat, like long, skinny egg noodles.  They're a harder pasta and while they do get kind of pasty during the canning process, they tend to hold their shape and have a decent consistency when you go to eat them. 
 
Other hard pastas like shell macaroni do fairly good in home-canned soups too.  Another idea is to can the soup with all the other ingredients such as meat, vegetables, and broth, and add the noodles when you heat up the soup to eat. 
 
You can use rice instead of noodles too but be careful not to over-do it.  Rice will swell 3 times it's size.  If you put a third of a cup of dry rice in the jar with the broth and other ingredients you'll have a cup of rice in the jar after it cooks in the canner.  If you're using pint jars, your rice now fills half of the jar.  I'd recommend using no more than 1/4 of a cup of dry rice in a pint jar, and not more than 1/2 cup in a quart jar.
 
Another way to avoid using pasta is to put diced potatoes in the soup.  They add body and starch to the soup but don't turn into pudding.  We love to put venison chunks together with the goodies from our garden:  potatoes, carrots, onions, and celery.  It's truly a 'homemade' soup then, other than the salt and pepper!  I've canned large batches of this in years when we were successful during deer hunting season.
 
You can add dry beans to soup too.  One of my favorite soups to can has dry beans, ham chunks, onions, crumbled dried parsley or celery leaves, salt and pepper, and broth poured over it all.  Black beans go well with tomatoes, onions, peppers, (cilantro if you like it), and ground meat (also optional), with some taco seasoning in it.  I'm thinking of trying it out with either some tortilla chips or broken taco shells in the jars one of these days, to see if those turn to mush or if it works to include them in the jar.  Though eating the chips with the soup is another fine option.  These soups can be processed for a shorter time if they don't have meat in them.  Check the canning charts to find the length of time and the pressure for each ingredient, and then use the longest one.  
 
 
In this picture I'm getting ready to make chicken noodle soup.  I put frozen mixed vegetables in the jars.  Then I put in chopped onion, dried chopped celery, and dried crumbled spinach.  I added salt, pepper, garlic powder, and a few flakes of red pepper.  Then the meat went in, followed by a couple of small handfuls of egg noodles, and I poured broth over it all.
 
These are the jars filled with the 'dry' ingredients.

Now I've poured the broth over them and they're ready to be canned.  When you can soup or any other mixed foods you process it at the time and pressure for the longest food in the group.  In this case it was the chicken.  I processed the soup at 15 lbs. pressure because we live at 3,500' elevation, and for 75 minutes after it reached pressure.
 
I thought I took a picture of all the jars in a row after I took them out of the canner, but here's
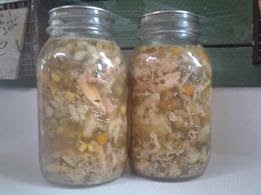
a close-up of the soup after canning.  I shook them gently to mix the ingredients.  My pasta didn't clump like it does sometimes but the noodles look pretty swollen and soggy.  It'll be like chicken and dumplings when we eat it.  I was out of fettucine noodles so I went ahead and used egg noodles.


This is some chili that I made and canned a few years ago.  There were originally 21 quarts and we're down to the last few jars now. The only reason there is any left is that I put them away in a cabinet and forgot they were there.  These were the 'overflow' that didn't fit on the shelves with the rest.  We plan to eat them soon since they're almost three years old, but I'm sure they're still fine.
 
 
Back before I learned how to make my own soups I had only had store-bought soups, and I thought of them as "punishment food".  Homemade soup is nothing like it's store-bought canned counterparts.  Even if you don't want to make large batches and can them, you might enjoy trying out a few homemade soups. 
 
Some of the better ones we've made lately are cream of potato soup with shredded cheddar cheese on top, and cream of tomato soup.  I haven't made batches big enough to can yet but I am going to try that one day soon.  I'm wondering if the milk in the soups could make them scorch during canning.  If any readers have experience with this I would love to hear from you!
 
 
Please leave comments or questions below, or email them to me at:
 
 
Thanks!
 
Susan


Sunday, January 19, 2014

Food Storage Tips - Guest Post


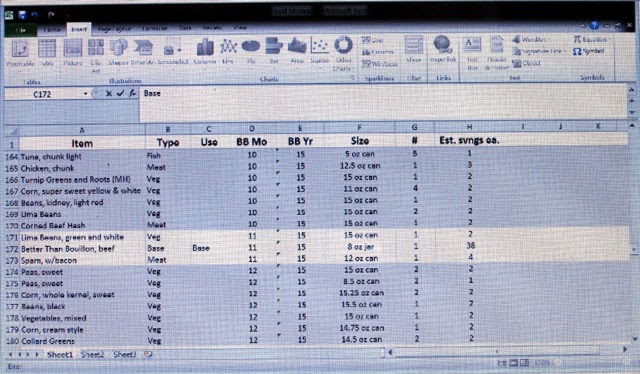
I love the emails I get from readers, and every now and then someone shares their story.  When I emailed this woman back and asked if I could use it for a blog post, she not only said 'yes', she emailed me a copy of her spreadsheet and a picture! 


"When I started prepping I had more extra money every month than I do now, but even then I had to be careful.  I made a rule: anything on my shopping list that I know I will need or want in hard times, I would buy at least one extra for storage.  I prefer fresh vegetables, so if I were buying fresh corn, then I also bought a can or two of corn, if it was on sale.  I increased my shopping budget for about 6 months, but I have a good pantry full of things I know I will enjoy in an emergency.
 
I needed storage space for food, so I went on a hard core cleanup, donating or throwing out things that were less important to me than food would be in an emergency.  That was tough at the beginning but is easy now.  I look at old games or books or clothes and throw enough away to make room for one meal, or a week’s worth of meals, or whatever.
 
Then, because I could not stand the idea of allowing any of this hard-won food go to waste, I organized my food by expiration dates.  So, everything that expires in Jan 2014 is together – milk powder, vegetables, meats, bouillon, etc., and then all the food for Feb 2014, and so forth.   Naturally, everything in storage has its expiration date written on the front with a Sharpie. 


Everything is in the pantry but on the first of each month, I bring next month’s food into my kitchen cabinet and look for recipes to use every scrap before it expires.  I’ve learned to make new dishes and can say proudly that nothing has been thrown out! 
 
Because I wanted easy access to food I might need, I also made a spread sheet of all my food on the computer and can search for “tomatoes” if I run short.  So, the next rule is: replace anything used from storage.  The system works well for me because I am forced to use food by expiration date rather than running the risk of missing the use of something located in a group of its kind.  The next 2 rules: remove any item from the spreadsheet that is removed from the pantry and add newly-bought items to the spreadsheet before putting into the pantry.


For “treats” I have collected a variety of local honeys, which I absolutely adore.  I have also bought large containers of raw honey for medicinal purposes in a time of great need.  Honey is yummy, has antibacterial properties, and can be stored easily forever.  The perfect food!
 
Oh, yes, and I used my tax refund for freeze-dried meats, vegetables, and fruits instead of the vacation or clothes-shopping I might have done otherwise.
 
I am almost 66, live alone (well, with 3 dogs and 2 cats) in the country, keep a pretty ordinary garden, and am more than a little worried about our future.  I’m not anyone’s psychic friend and have no idea how things will play out, but I do know that I am far less worried now that there are rows of food in my pantry.  Prepping has done me a lot of good already!
 
Thank you, Susan and Dave, for your helpful books (I also have “Life Without Refrigeration” and “Preserving Meat, Dairy, and Eggs”).  I try to save a little money each month for helpful books, too.
 
TuationNC
 
Thank you, TuationNC, for letting me share this with others.  I'd welcome more information like this, or stories of how you needed or used your preps/food storage in hard times, or anything else that could help or encourage our readers.
 
Please leave comments or questions below, or email them to: povertyprepping@yahoo.com

Wednesday, August 21, 2013

Canning Potatoes

We grow a lot of potatoes.  It's one of the things, along with other root vegetables like carrots and onions, that grow well in our cooler northern climate.
 
This is me digging our potatoes.  They're a staple food for us over the winter.  By the time we're done digging we usually have five or six bushels of potatoes.

I spread them on old sheets on our living room floor for a few days to dry.  Some people spread them outside (if at all) but we have too many wild critters who would help themselves if we did that, plus nights that could drop below freezing at the end of summer. 
 
When they're moisture from the ground has dried and their skins are a little cured I pack them into wooden boxes with handles and move them to our root cellar.  They keep very well until about May, when they start sprouting eyes.  When that happens I break off the eyes and bring them in.
 
Some are saved for planting but the rest are dehydrated to use over the summer.  These are cubed, dried potatoes packed into jars, but I also dry them as slices and shredded potatoes, and I've put dried, mostly-cooked potatoes in the blender and made my own instant mashed potatoes.

 I tried canning them a couple times thinking it would be handy to have potatoes ready-to-go for quick meals in the summer, but they were only good for mashing when I opened the jars.
 
Then a friend of mine told me she was writing a book about canning potatoes.  I didn't think that would be a very long book, but she said she was going to include several recipes for using canned potatoes, both homemade and store-bought canned potatoes. 
 
Okay, I thought.  That's more like it.  I can always use more recipes because I get tired of my own cooking.  And she's often told me what she was making for dinner and my mouth would water.  I wish I had her knack for creativity in the kitchen.
 
She published her book and I read her recipes and I thought "aw man, that sounds really good!" as I read each recipe.  I opened a jar of my potatoes and tried one of the recipes and it was 'oh my goodness' good, and it was fast and easy:
 
Potato, sausage, and egg breakfast burritos
1 pound ground sausage
1 quart diced canned potatoes
1 dozen eggs
Pepper to taste
Shredded cheddar cheese
Flour tortilla shells
Brown sausage (drain), add scrambled eggs, and cook until eggs are thoroughly done, stirring to scramble as you cook them. Drain and add diced potatoes. Add pepper to taste. Scoop onto warmed tortilla shells and top with shredded cheddar cheese.

This was even faster and easier for me.  I had browned a pound of sausage the morning before, to make biscuits and gravy, and packed up half of it and put it in the fridge.  So all I had to do was scramble the eggs, add the leftover sausage, and follow the rest of the directions and we had an almost-instant and very delicious breakfast.
 
And that's only one of the really terrific recipes and ideas in the book.  She also included the directions for making caramelized onions, which I've never had but looks really good.  I can't wait to have more adventures cooking out of this book.
 
If you're expecting to have a lot of potatoes this winter, you might want to take a look at this book.
 
 
PS: She also gives a lot of great tips such as not to cube your potatoes too small
when you can them, and she'll tell you why!
 
Please leave comments or questions below, or by email at:
 
Susan