Sunday, June 16, 2013

Guest Post - "Redneck Emergency Kit"

by Tristan Miske
 
My parents and my parents-in-law do crazy things like rafting or kayaking wild rivers, and backpacking and camping and things like that.  They've been trying to find a truly waterproof way to pack a few emergency supplies, so I decided to experiment.
 
I've heard of using small containers like Altoid mint tins or vitamin bottles, and probably a few others I can't think of right now.  But after watching guys at work, and other places where I hang out, throwing away chewing tobacco cans I decided to give them a try.  For the record (mother, are you listening?) I don't chew tobacco, I swear they're someone else's cans. 
 
 
I started off by laying a book of matches in the bottom of the can.  Then I dug some dryer lint out of the trash can in our laundry room.  I know I could have soaked the dryer lint in Vaseline or something else to make it kind of like a fire starter but I thought it might get the matches gooey and make it hard to light them.

 
Before I stuffed the dryer lint in the can I took some of it outside and lit it to see how well it caught fire and how good it burned.  It passed the test, so here it is, nestled in the can with the matches underneath it.

 
The top part of these cans have a separate storage space.  It's supposed to be a place to discard 'used' chew, if you need a place to put it.  I put four ibuprofen tablet in there, but you can put other pain relievers such as aspirin or Tylenol in there, or small hard candies for emergency energy.  If you're diabetic the candies might be a good sugar fix if your blood sugar drops.  That might happen if you are unexpectedly in the wilderness longer than you planned.  I'm not real familiar with diabetes, so I'm just talking from vague things I've picked up along the way.  I'm barely an adult, so don't be too hard on me. I do take preparedness seriously though.

 
Now time for the submersion test.  Into the sink and then I filled the sink with water.  But...it floated.  Well, that's actually a good thing, because if, for example, you're on a wild river and you dump into the water and your little kit gets away, it floats.

 
But I wanted to see if it was really watertight, so I forced it under the water.  After a few minutes of staring vacantly at it I weighted it down with something and left it for a while.  When I came back I opened it up and the contents were still dry.  I made up two more and submerged them as well, to make sure it wasn't just the first can that was water tight.  All three cans emerged from the water with dry contents.

 
Knowing how invisible something like this little can could be on a river or lake, I tied some of this marker tape around the can.  First one direction, then the other, and tied them together.  That gives the can visibility.  If you're staying on dry land you might not want to use the bright tape around it, but remember, it's possible to fall into water when you're not expecting to.  I have...um, family members, who have fallen into streams while crossing on downed trees.  If they needed to make a fire to dry out clothes and warm up, they would have this handy little kit to start a fire with.  If they got bruised up in the fall, they could make use of the ibuprofen.  If the can fell out of a pocket, they could find it and retrieve it, and hopefully not fall in again getting the can out of the water. 
 
I'm thinking of other things that could be put in these little cans.  A small compass maybe, and a map printed as small as legible and folded to fit in the can.  No one plans to get lost, but it can happen.  I'm on Search & Rescue, and we hear that a lot.  Another thing that could go in the can is a fish hook and about a 10' length of fishing line coiled up and tied.  Fishing line takes up almost no space.  If you get strong enough fishing line you could use it for snares for small animals, doubling it if you need too.  But then we're talking about survivial food for the seriously lost folks.
 
If I come up with more cool combinations for the kit, I'll send in updates to be added to this post.  Thank you.
 
 
Thank you, Mr. Miske, for this information.  It's always nice to see the younger generation taking preparedness seriously and doing things like this.  Keep up the good work, and please do send in more as you experiment.
 
Please leave comments or questions below, or email them to:
 
 
Susan and the Poverty Prepping team
 

Thursday, June 13, 2013

Guest Post - "First Aid Management"


Why You Should Know the Basics of First Aid and How You Can Be Prepared With Your Own First Aid Kit.


A knowledge of basic first aid can make the difference between life and death. A brief glance at some statistics shows why:
  • In 2009, there were 24, 690 serious injuries and 2,222 fatalities on the UK’s roads
  • Road traffic accidents are one of the top ten causes of death worldwide
  • The British Heart Foundation estimated that there are approximately 124, 000 heart attacks in the UK each year

However, several studies have shown that effective first aid can be vital in the first few minutes after an emergency. First aid is an important life skill. A first aid qualification, such as those from First Aid Management can help your CV/personal statement, or even open up job opportunities. There are also opportunities to volunteer using your first aid skills. But more importantly, it helps in being prepared for any unexpected situation involving a medical emergency, both at home and at work.

There are 3 main aims of first aid:

Your first aim is to preserve life by carrying out emergency first aid procedures (such as opening a person’s airway using resuscitation techniques). Secondly, you should attempt to prevent the casualty’s condition from deteriorating further. This could include asking them to stay still to prevent movement of possible fractures and by stopping any bleeding. Finally, you can promote recovery by arranging prompt emergency medical help. In addition, simple first aid can significantly affect the long-term recovery of an injury. For example, quickly cooling a burn will reduce the risk of long term scarring.


To be prepared to assist in the event of an injury, medical emergency or disaster, it is important to have a basic first aid kit on hand - and it’s not even as expensive as you might think!

You can buy a small basic first aid kit for around $25 from your local department store, or you could put together a household kit for yourself. Here are some things to include:

- Adhesive plastic strips, large packet

- Sterile wipes

- Antiseptic

- Different sized bandages

- Sterile dressing

- Dressings, adhesive and non-adhesive

- Saline eyewash solution

- Gauze swabs

- Tweezers

- Small scissors

- Safety pins

- Disposable gloves

- Paper tape


My thanks to the reader who contributed this post.  I appreciate those who contribute in any way, either by writing guest posts, or who leave comments or questions.  My guidelines guest posts are that the post has to contain information that is of interest or educational pertaining to the subject of preparedness, preferably from a low-income perspective.  My goal with this blog is to help people fine affordable ways to be prepared for whatever may happen.  Product links in the post are acceptable if 1) they pertain to affordable preparedness, and 2) the actual article has real information that doesn't require clicking to a link to get the rest of the story.
 
Please leave comments and questions below, or email them to:
 
Thank you!
Susan and the Poverty Prepping team


Wednesday, June 5, 2013

Dehydrating your own "Instant" food


A lot of people are familiar with "Minute Rice", which only takes 'a minute' to cook.  Minute rice is just pre-cooked rice that has been dehydrated.  They may use a freeze-dry process or they may just dehydrate it.  But it's easily made at home.
 
Have you ever left a plate on the counter with a few bits of rice on it, and the next morning it was hard and dry?  You've just made Minute rice by way of not doing your dishes before you went to bed!  Or those dried grains of rice on the inside of a pan...more Minute rice.
 
That's not the way I recommend you make it though.  I cook a pan of rice until it's nearly done, making sure it's not too chewy and hard, but not cooked into a clumped mass of almost-pudding.
 
Then I drain it if necessary and spread it on screens or dryer racks.  After a few hours of drying I use my fingers to stir up any clumps, and I might do that again a time or two, just to separate all the grains of rice.  I don't worry too much about small clumps when the rice is freshly cooked.  It's easy to break them up as they dry.  Any clump bigger than a large pea, I try to break up and spread out.  But even bigger clumps can be broke up a couple hours into the drying process.
 
Rice dries quickly.  Depending on how you're drying it, it can be as fast as a few hours or as long as overnight.  An electric dehydrator is the fastest.  I've dried rice on cookie sheets in the oven with the pilot light for heat, and on shelves above our woodstove.  If you live in an area with very low humidity it would dry just fine sitting on the kitchen counter.
 
Store the instant rice in an air-tight container, preferably glass or metal.  The cooler and darker you store it, the longer it will taste fresh when you use it.  It will always be safe to eat, but the flavor will eventually fade or flatten.
 
To cook the rice, use equal parts of water and rice.  I've put the rice right in the water at the start, and I've also waited until the water boiled before adding the rice, and I haven't noticed any difference.


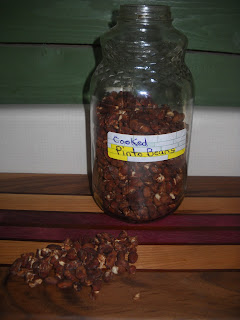
I dried pinto beans so that I would have "instant" beans that I could use on short notice.  I usually Can dry beans for 'Instant" beans but I wanted something that didn't use up my canning jars.  In the winter when our woodstove is going to be hot anyway, I cook up pots of beans with the 'free' heat.  Some are still canned, but in the last few years I've started drying a lot of them.
 
Cook the beans until they are completely cooked and soft, but not falling apart into mush.  Then spread them on screens or racks to dry, just like the rice.  They dry a little slower than the rice but a lot faster than I expected.  Store in an airtight container.
 
To use the beans, soak in water for 15-minutes to half an hour.  Then use as you would freshly cooked beans.  At this point I often mash them and make refried beans, adding a bit of onion and garlic.  I also make bean soup by adding onion and chopped, cooked bacon.  Use them in whatever favorite recipes you have for beans.
 
This works with all dry beans, as well as with lentils and split peas.  It's a good way to have an assortment of ready-to-use beans, lentils, and split peas on hand, ready to use.


I tried an experiment with boxed macaroni and cheese.  I know it doesn't take long to make boxed macaroni and cheese, but I wanted something we could heat quickly while camping, and not use up much stove fuel. 
 
The first batch I did, I cooked the macaroni until it was done, drained it, and spread it to dry.  When I went to use the "instant macaroni and cheese", the macaroni turned to mush in the pan and stuck together in a huge clump. 
 
The second time, I cooked the noodles until they were somewhat soft but still chewable.   I drained and dried them, and then when I added them to boiling water, they finished cooking in about a minute.  I mixed the milk, butter, and cheese packet into the noodles, and the finished meal was undistinguishable from freshly-made macaroni and cheese.
 
I store the cheese powder packet in the jar with the noodles so they're handy to prepare.
 
Did I save anything by doing this?  Not really.  It still took fuel to cook the noodles, whether I pre-cooked and dried them, or just prepared them at the time the were to be eaten.  The only advantage I can see is for using it as camp food, or in a bug-out bag.  In a bug-out situation, if you even have a small stove of some sort, you'll definitely want to conserve fuel.  And if you have children and have to bug-out, it's a nice comfort food for them.  Be sure to include powdered milk and possibly powdered butter, and maybe some salt.  I haven't put this in my bug-out bag yet, but if I do, I'll mix the powdered milk, powdered butter, and salt in a small ziplock bag and put a rubber band around it and the jar, or use masking tape to attach it.
 
It could also be used during a time of power outage or any other interruption to your source of energy for cooking.  If you don't have a back-up way to heat food, it's a good time to do research on it.  There are old posts near the beginning of this blog with some good ideas.
 
 
Please leave comments and questions below, or by email at povertyprepping@yahoo.com
 
 
Thank you!
Susan and the Poverty Prepping team.